**Join me in Chicago to learn artificial lighting hands-on at our Lighting Intensive workshop!! The next workshop will be held on March 25, 2018 in Chicago! For more information – click HERE!**
http://workshops.christytylerphotography.com/lighting-intensive
**Disclaimer – This FAQ post (written in 2012) explains how I use my on-camera & off-camera flashes. This is by no means the answer to everyone’s problems, and it is by no means the only way or the right way to do it… it is just my way. So if you do it differently – that’s fine! And if this helps even one person figure out how to better handle reception lighting and artificial light – then awesome! 🙂
Hey guys! I’m so excited – now that things have slowed down a *bit* around here this winter – I can finally tackle some more in-depth posts I’ve been meaning to do all year! I saved all the emails you guys sent and labeled those with photography questions as “FAQ” in my gmail so I wouldn’t forget about them!
So – I’ve gotten quite a few questions asking about how I tackle reception lighting and on-camera/off-camera flash. Let me just say that I finally invested in my off-camera lighting set-up this past May at the start of wedding season and I’m SO glad I did!
Dealing with strange lighting situations and figuring out my flash on the fly at receptions was one of the BIGGEST challenges for me early on in my business when all I had was my Canon 20D, 50mm 1.4, and a 580EX II flash – eeps!! (Hey, we all start somewhere, right?!) I absolutely dreaded those dark reception halls and flash photography… and it took everything in me to not just run away after the sun had set. Okay, maybe that’s a little dramatic… but I definitely was not a fan – which is slightly ironic given that we covered ALL sorts of off-camera lighting in photography school. The difference was that most of it was in a studio with fabulous (& numerous) studio lights, plenty of time, and seemingly one million other things you don’t have available to you on a wedding day.
So – what’s a wedding photographer to do?! Well, first of all – I invested in a bit of gear (the bare minimum necessary to make this work). And then I practiced – A LOT… And went back to my photo school notes to review… And then practiced some more… and more… and more.
To start this out – here’s what I use for my set-up!
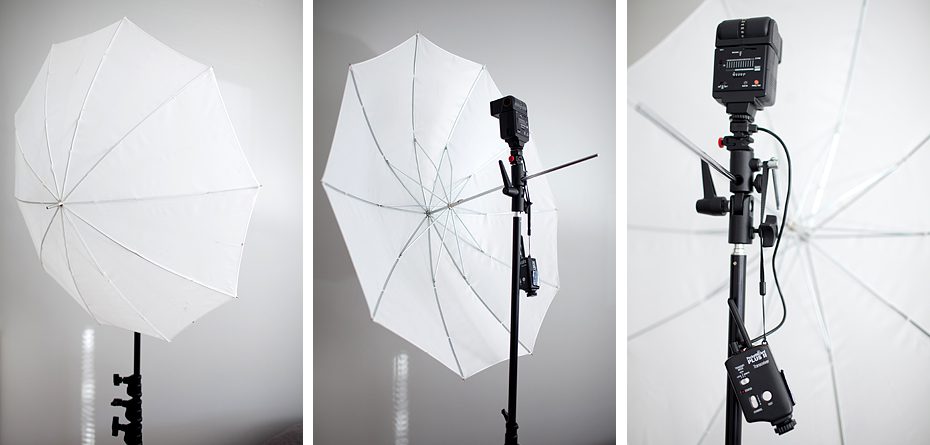
For Off-Camera:
- Light Stand (& flash mount)
- Medium-sized Umbrella (& umbrella bracket)
- Flash (I use the old, manual flash I bought back in 2006 in photography school for my off-camera set-up – a Sunpak 383 – I don’t know what the current equivalent to this is? I love this because it does everything I need it to do – and it doesn’t have an automatic shut-off, so it’s always on & ready to go! And I didn’t have to buy yet ANOTHER piece of equipment!)
- Pocket Wizard
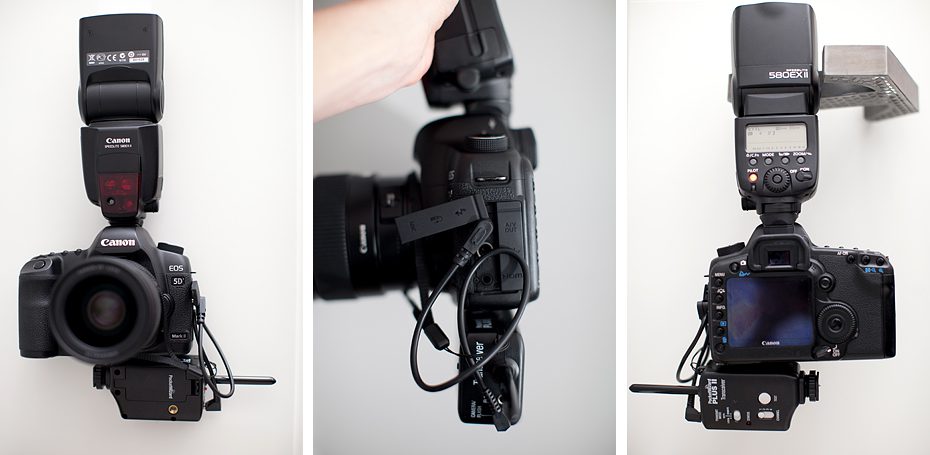
For On-Camera:
- Pocket Wizard (…which I have ghetto fabulously rigged up to my camera with velcro! Hey, it does the job!)
- Flash (for this I use a Canon 580EX II)
I use this set-up in various situations and in various ways. Which I’m going to explain to you shortly!
But first – my general settings are the following (so you have an idea where to start):
Off-Camera Flash – set to MANUAL (which, for my flash, there is no other option) and I set it to its lowest power setting of 1/16. (Newer flashes clearly have more options for power settings. For example, the 580 EX II goes all the way down to 1/128. Basically, the closer the flash is to the subject, the lower you want the power.)
Light Stand – I set it anywhere from 10-20 feet from where the subject I want it to back-light is sitting/standing/dancing (depending upon the size & layout of the reception room). I set the height of it so that the flash is about 1 to 2 feet above where person’s head will be. During speeches/dinner – I set it at about a 45 degree angle from the subject’s back. During the dancing portion of the night I move it somewhere closer to the dance floor – near a wall, pole, or anything else that will keep it from getting knocked over (if possible). Ideally – I like to have the light shooting towards the DJ so that I can stand at the DJ booth and shoot into the crowd for the dance shots (to get reactions of the crowd sitting at the tables, or surrounding the dance floor, instead of just the DJ booth in the background).
Umbrella – I usually have the umbrella on for photos during the speeches/dinner – because most of the time I’m forced to put my off-camera flash closer to the bride/groom than I would like to due to the layout of the room. Also, the umbrella softens the light but it still has a nice directional quality to it. Then for the dancing shots – I remove the umbrella and usually shoot into the light for the fun, back-lit, flare, action shots I like for this part of the night.
On-camera Flash – set to ETTL so the flash knows how much power to kick out to properly fill the scene with light. Since most receptions usually have ambient light (candles/Christmas lights/wall sconces/DJ lights) that can confuse the flash – I normally set it to +2/3 or +1 so that the image does not come out under exposed. (Also make sure to properly set the “Zoom” setting on your flash so it matches the lens you are using!) I should also note that if the room has neutral colored ceiling and walls I can bounce my flash off of – then I shoot with the on-camera flash aimed 45 degrees to the right (meaning if I were to set it facing straight up, then twist it to the right 90 degrees & tip it down 45 degrees). This set-up allows the on-camera flash to have a directional, almost window light-like quality to it. If there are strange colored ceiling/walls that I don’t want the light bouncing off – then I put a Gary Fong light sphere on my flash to more evenly bounce light into the scene.
Camera – set to MANUAL. I decide on the ISO, aperture, and shutter speed myself. I don’t like to leave this up to my camera to decide! A normal setting for my camera is usually around 1/125 (shutter speed) and f/2.0. (Obviously I make adjustments as necessary. For example – if I want more of the ambient light to come out in the images, or if I want a bit of motion blur, I slow down the shutter speed. Or if I want more people to be in focus, I close down the aperture to f/4 or so.)
You’re probably wondering what I do with my ISO now, huh? Well – that all depends on the off-camera flash! I usually start out with it around ISO 500 and shoot an image with the off-camera flash backlighting my subject and see how bright the rim light is from the off-camera flash. If it is too bright – I lower the ISO until the light is as bright as I’d like it to be. Or if it is too dark and I can’t really see the rim light showing up in my image at all – then I raise the ISO to 1000 (or whatever I need to get the look I want). As a general rule, the rim light should be brighter (by a stop or so) than the fill light. (**Note – the on-camera flash set to ETTL will compensate for any changes in ISO – so there is NO NEED to change any other settings when you are changing your ISO to adjust the rim-light’s brightness!)
To better explain exactly how I use all these different components – here are some examples! (Also – I should note – that in order to turn off my off-camera flash for a few shots – I just turn off the Pocket Wizard attached to my camera so it doesn’t send a signal to the other flash to fire. So I don’t ever have to actually walk to the flash to turn it off! :))
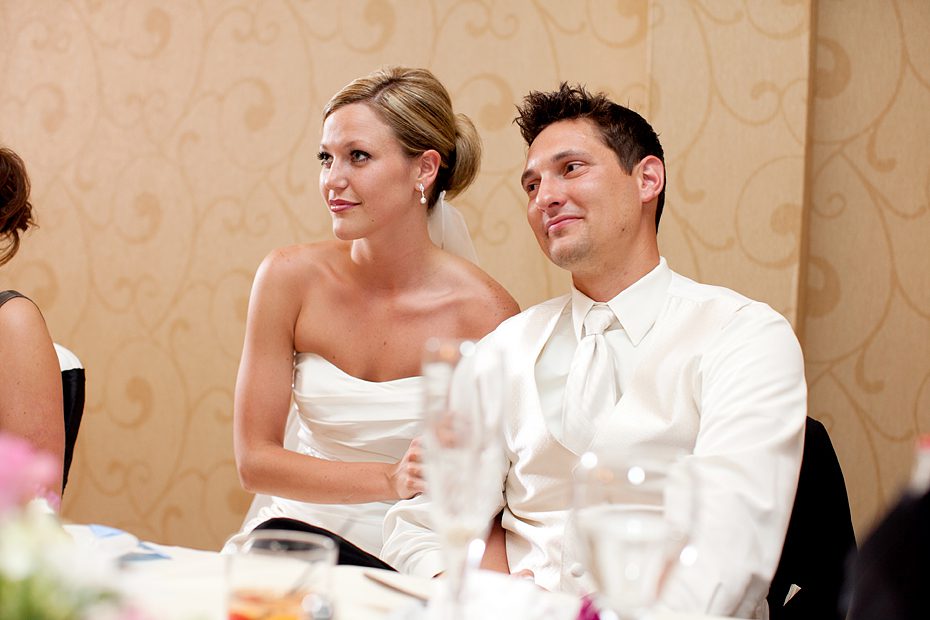
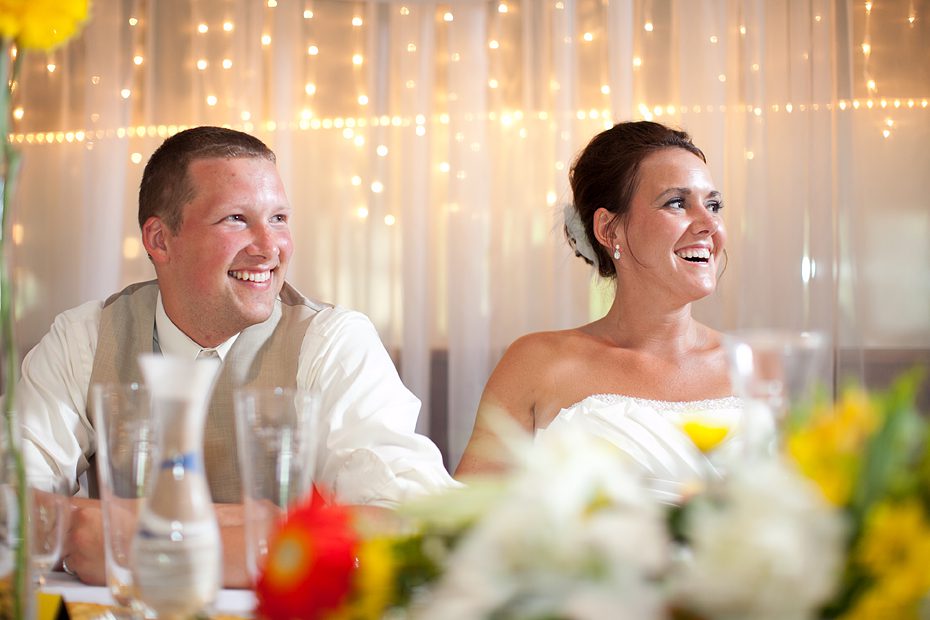
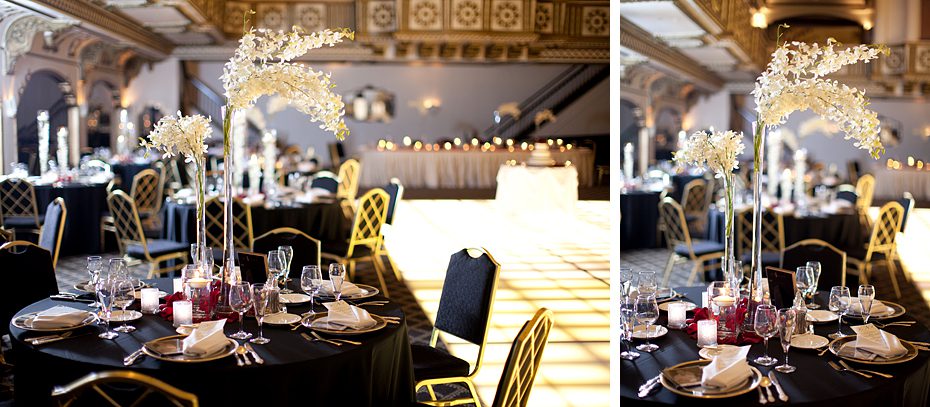
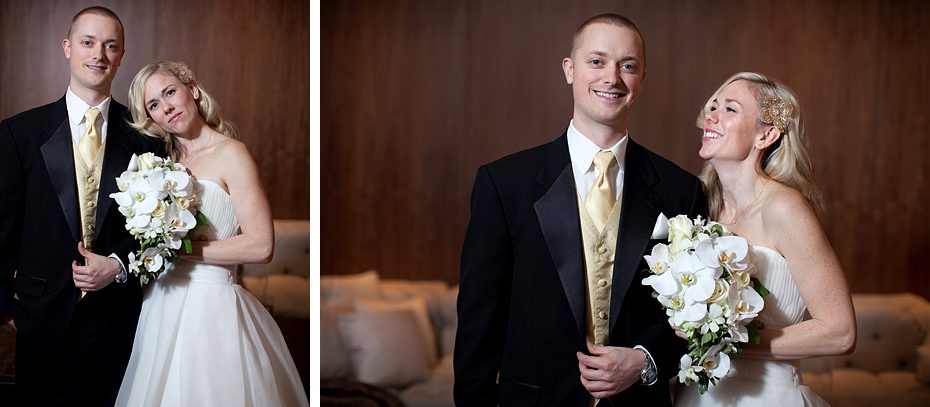
Off-Camera flash with Umbrella + On-Camera Flash
I had the umbrella on the off-camera flash on a stand to the left of the frame in the 1st image, and to the right of the frame in the 2nd. I used on-camera flash to fill their faces. Notice that the off-camera flash is slightly brighter than the fill flash to add dimension & directional quality to the image. Also – notice how soft the rim light is on their skin and faces. The goodness of using an umbrella! The bottom photo in this series uses the same technique – but for detail photos.
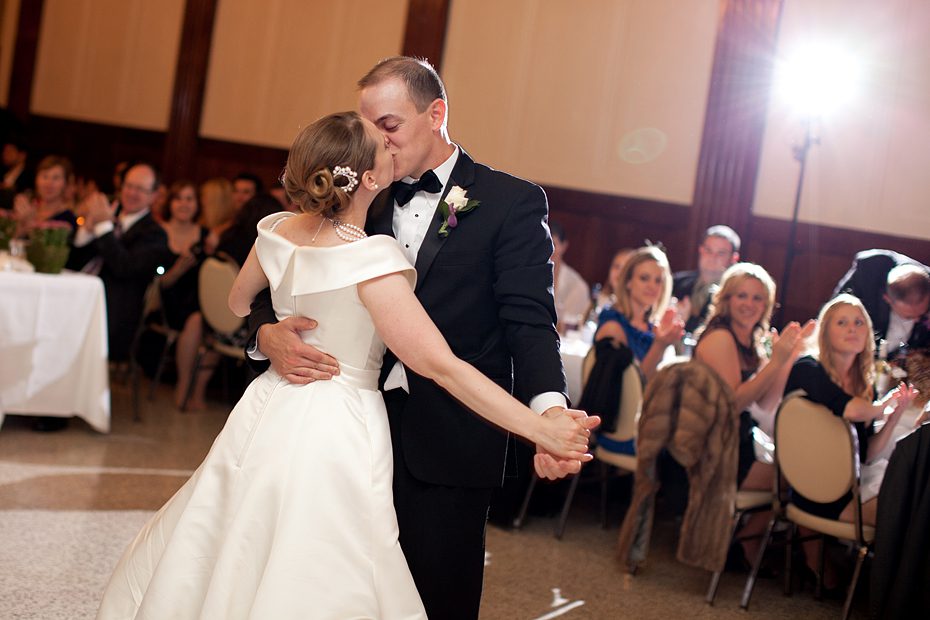
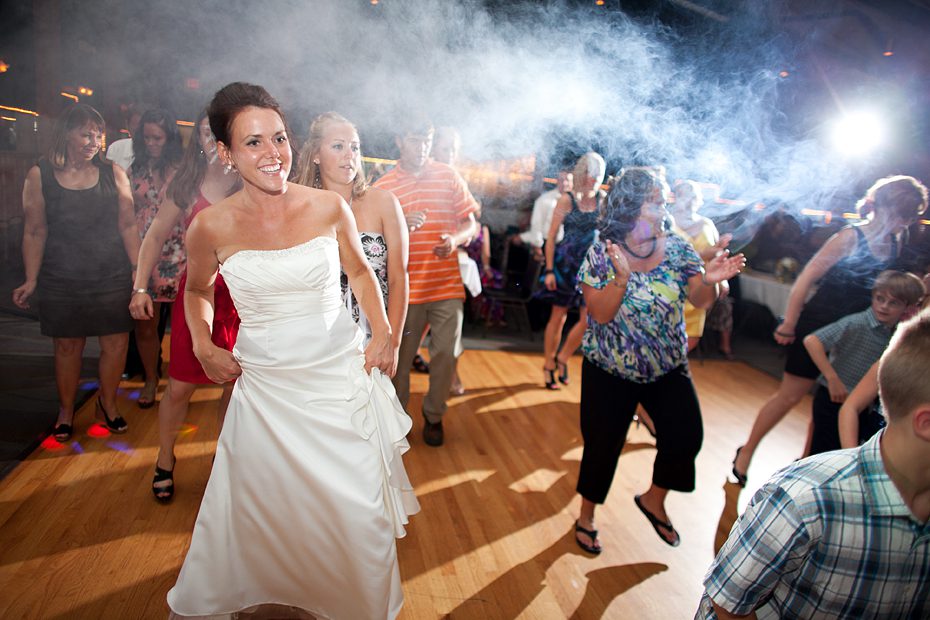
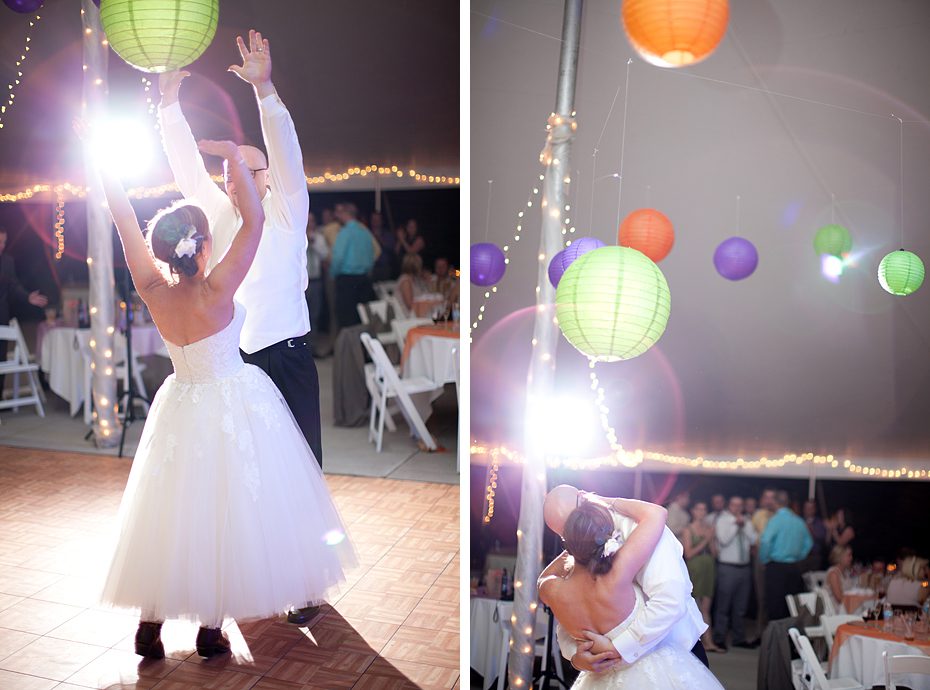
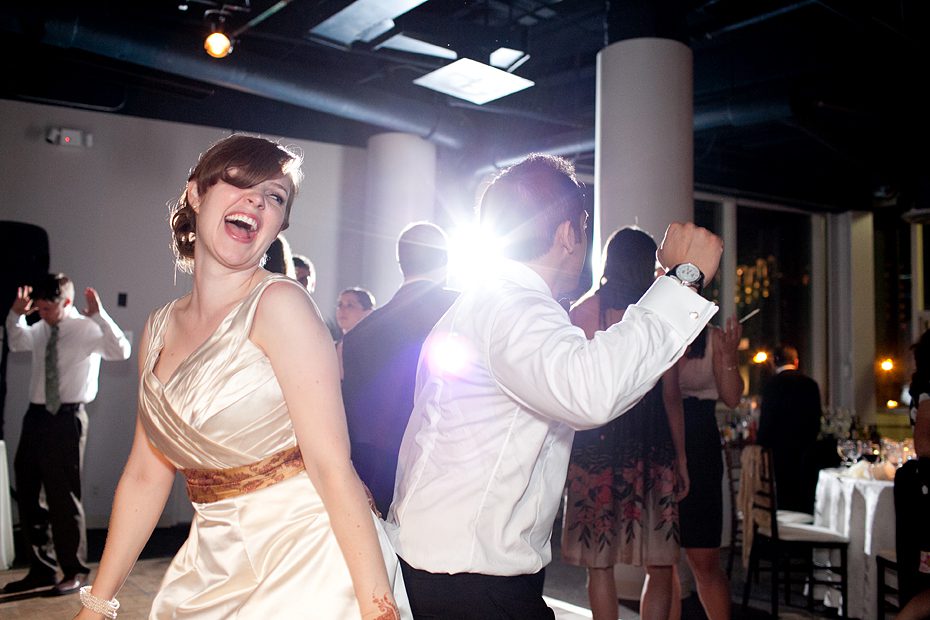
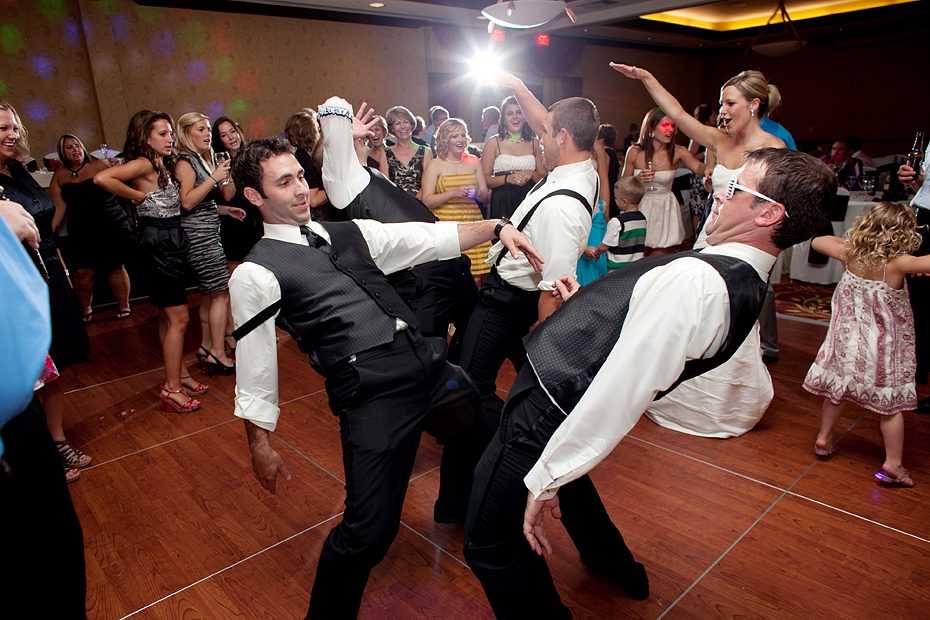
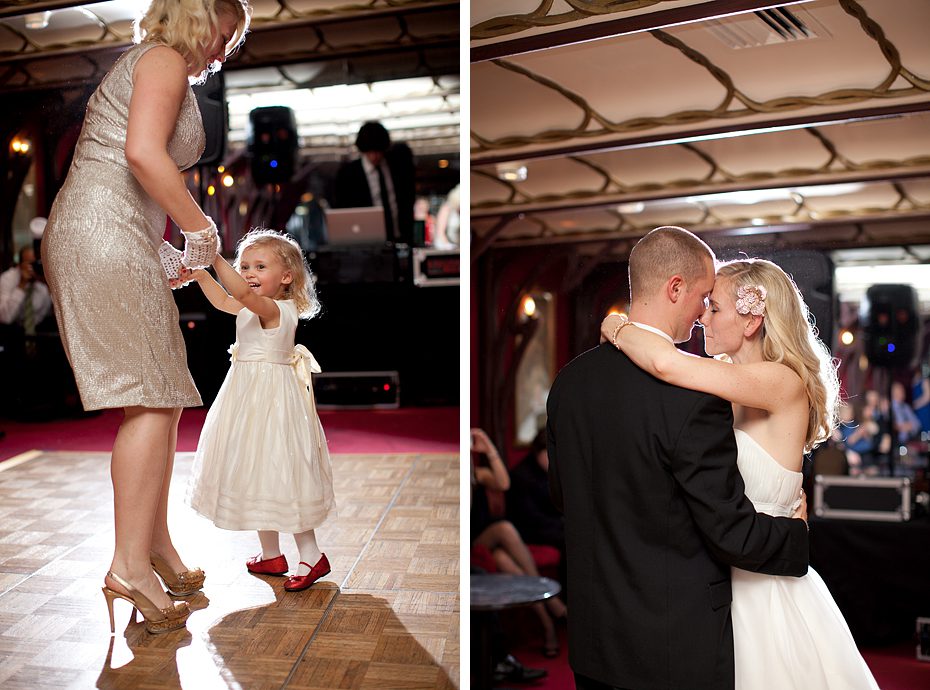
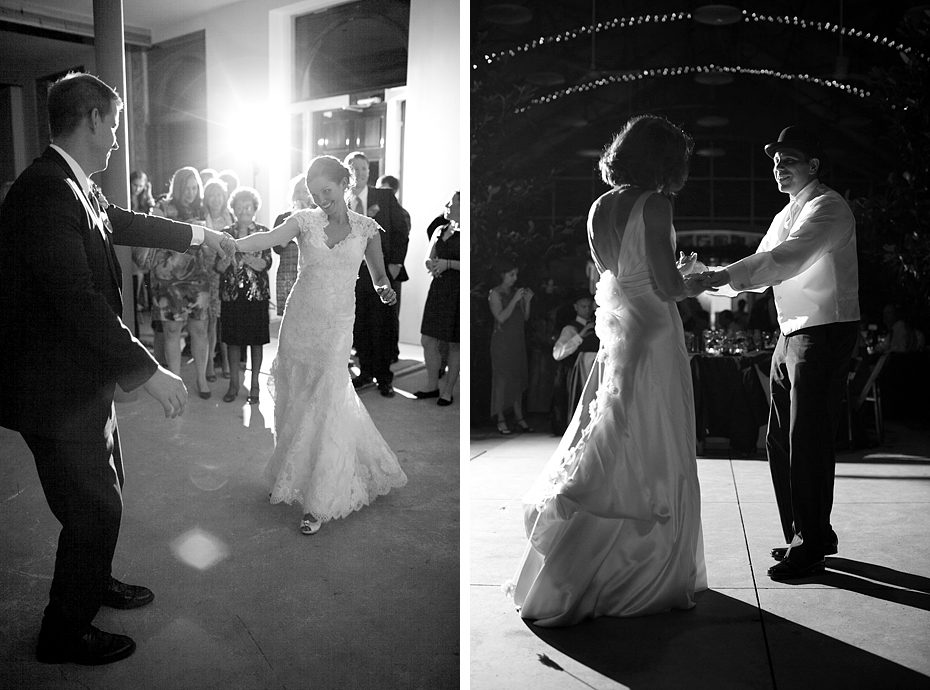
Off-Camera Flash (NO umbrella) + On-Camera Flash
Harsher, more obviously directional light – with the light source visible. Flare in some cases (intentionally) and on-camera flash used to fill in the scene. Notice that I’m always shooting into the off-camera flash. If I don’t want the starburst quality of light (or for it to be visible in the frame) – then I use the subject to block the light source, and let the light wrap around them (see bottom photos).
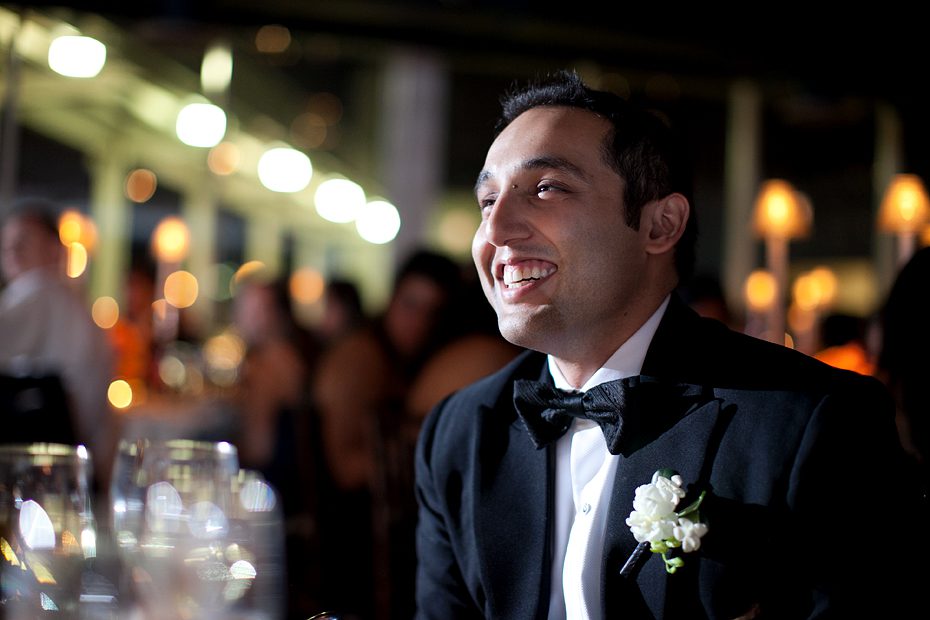
Off-Camera Flash Acting as Primary Light Source (No On-Camera Flash Used)
For these I turn off my on-camera flash and utilize the off-camera flash as the main source of light – mostly hitting the front or side of the subjects. (1st & 3rd image have NO umbrella on the off-camera flash. 2nd image has the umbrella on the flash.)
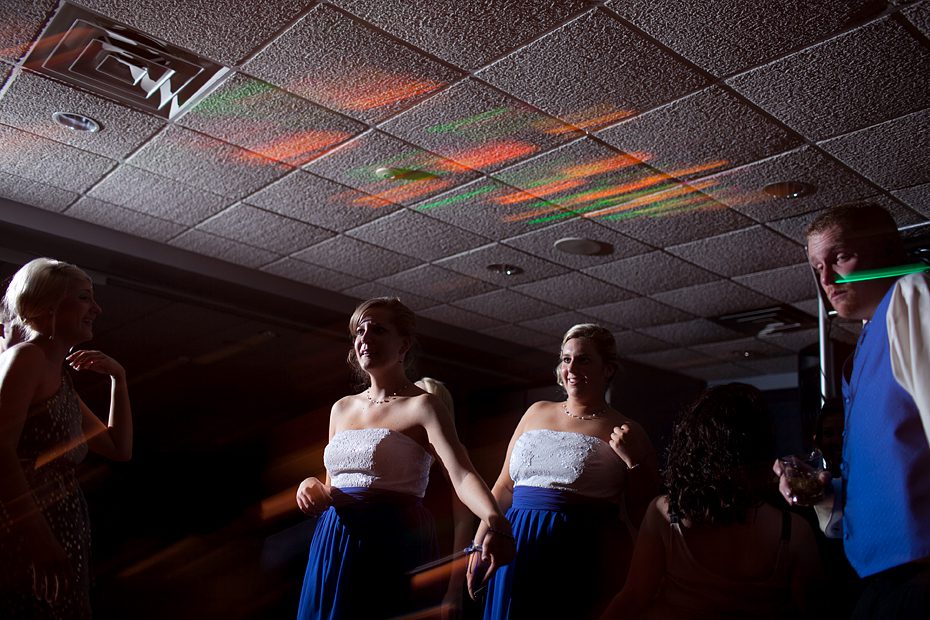
Off-Camera Flash Acting as Back-Light (No On-Camera/Fill Flash Used)
For a more dramatic and artsy look – you can utilize your off-camera flash as a rim light/back-light and turn off your on-camera flash so it does not fill the scene. (In the bottom right image I had an umbrella on the off-camera flash. You’ll notice the light is softer than in the others.)
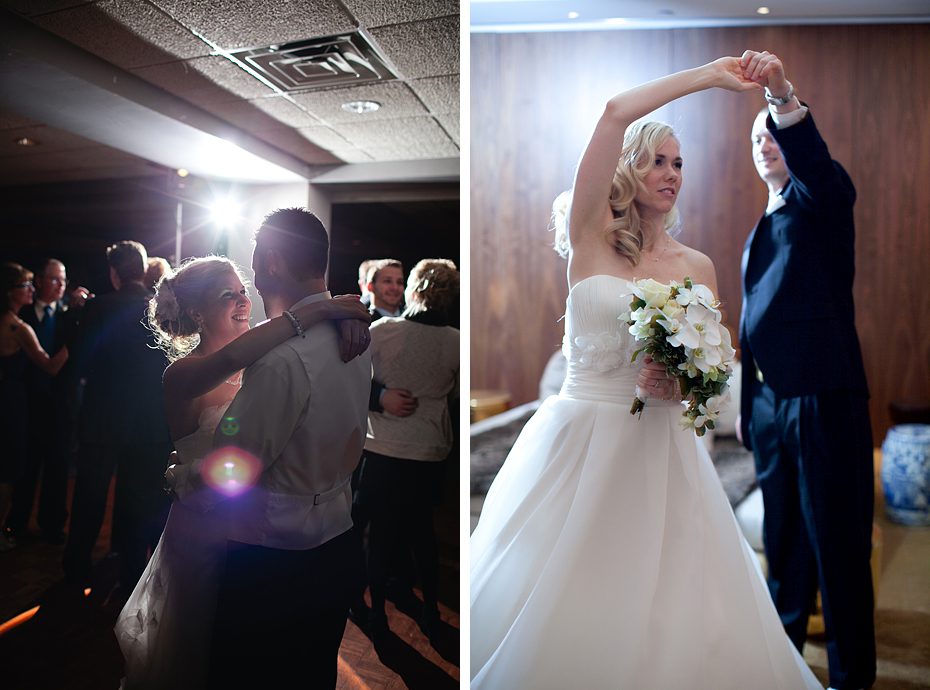
If you’re having trouble “seeing” the light I’m talking about… here are some more concrete examples of the same scene lit differently.
Left: Off-Camera Flash + On-Camera Flash
Right: Off-Camera Flash Only
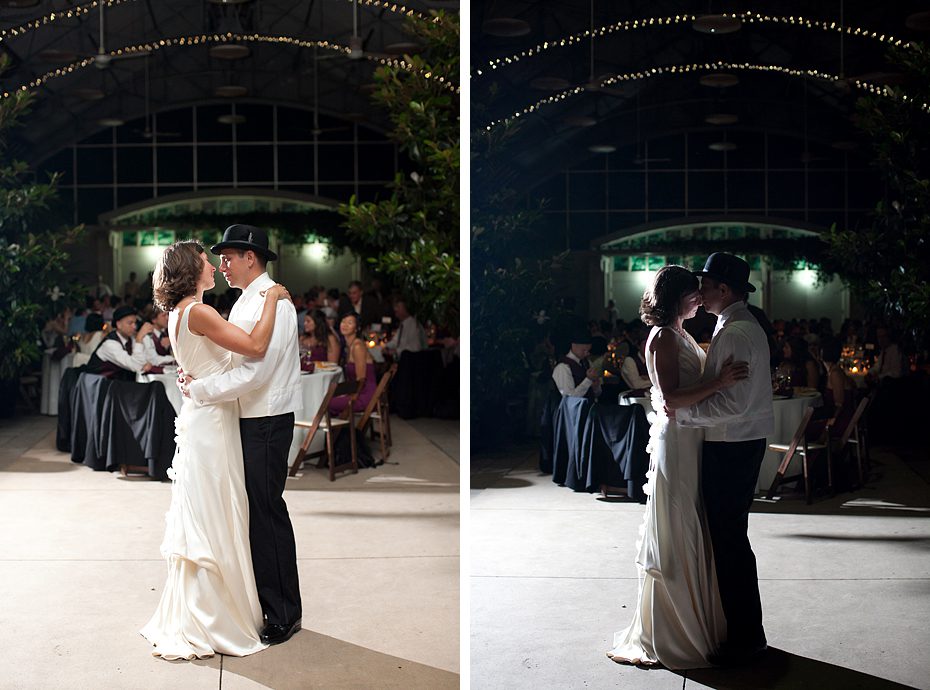
Left: Off-Camera Flash + On-Camera Flash
Right: Off-Camera Flash Only
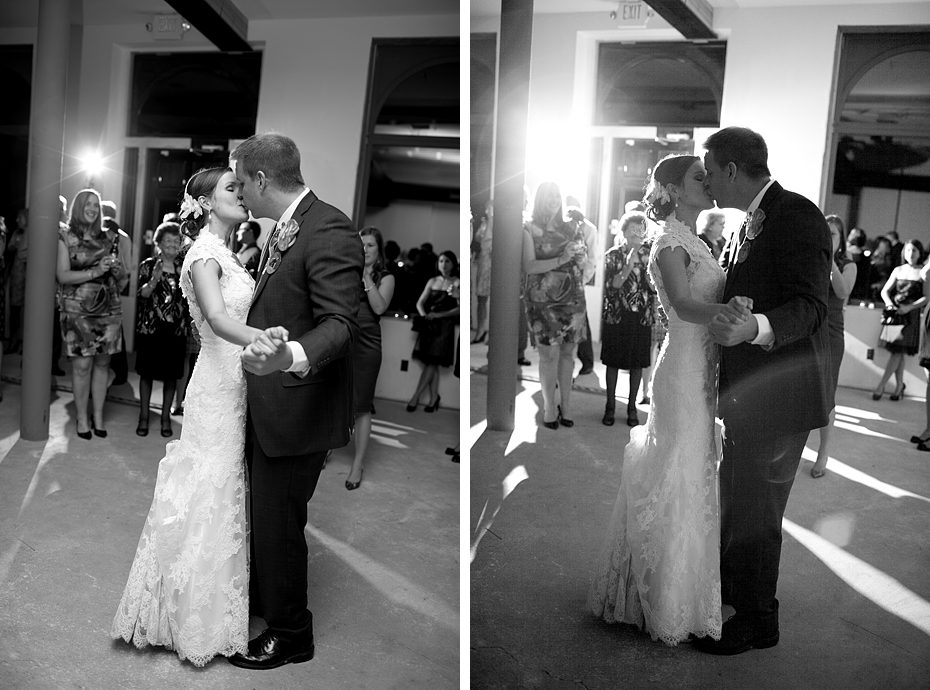
Left: Off-Camera Flash + On-Camera Flash
Right: On-Camera Flash Only (no rim light)

Hopefully this helped you guys to understand how I go about getting the images I envision in my head by utilizing my on and off-camera flashes in different situations. Please, please, please – if I have confused you – shoot me an email or post a comment with any questions you have and I’ll do my best to clarify/answer them!
xoxo! 🙂
** See an updated post and gear list HERE: https://christytylerphotographyblog.com/2017/10/faq-updated-off-camera-flash-reception-lighting-chicago-wedding-photographer.html


